Next Cloudinary – How to Integrate Cloudinary with Your Next.js Project

Written by Kolade Chris | Jul 20, 2024 | #Next.js #Cloudinary | 7 minute Read
Integrating Cloudinary with your Next JS project simplifies image uploads by removing concerns about storage space and application size, streamlining asset management on your website in the process.
When you use Cloudinary, you can effectively handle image uploads and organize your media in the cloud. This setup boosts media management capabilities, as you can also crop, resize, and format images easily.
This guide will walk you through the steps to fully integrate Cloudinary into a Next JS application. You’ll learn how to upload images directly to Cloudinary and retrieve them for display in your Next JS projects.
How to Integrate Cloudinary with Your Next JS Project
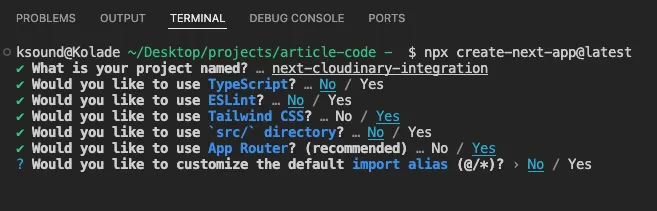
Step 1: Create a Next JS Project with your Favourite Package Manager
npx create-next-app@latest # if you're using NPMyarn create next-app # if you're using Yarnpnpm create next-app # if you're using PNPMFor this demo, I have made the following choices in the prompts:
Step 2: Install the Next Cloudinary NPM Package and Cloudinary
npm install next-cloudinary cloudinaryWe’ll use one of the components provided by the Next Cloudinary NPM package to display an upload button and the Cloudinary package to fetch the images after they’re uploaded.
Step 3: Get your Cloudinary Credentials and Save them in a .env File
You need the following credentials to be able to upload images and fetch images:
- cloudinary cloud name
- cloudinary API key
- cloudinary API secret
- cloudinary cloud preset name
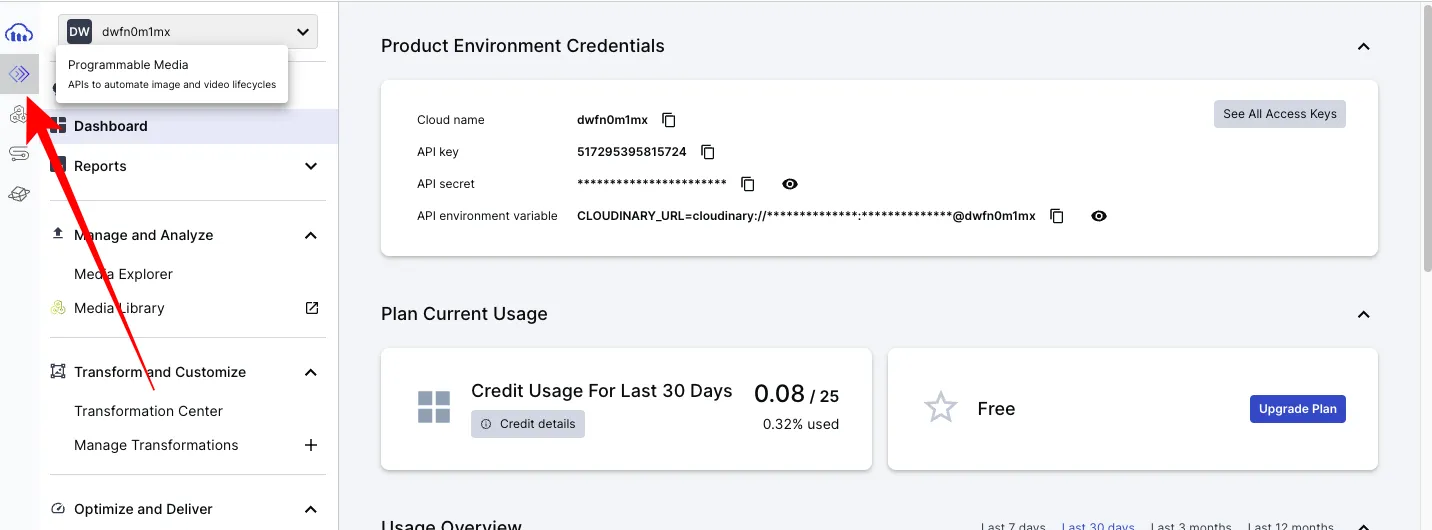
To get the first three credentials in the list above, log in to your Cloudinary account and click “Programmable media” icon on the top-left corner. You’ll see them under “Product Environment Credentials”.
Copy the three credentials and save them in a .env file like this:
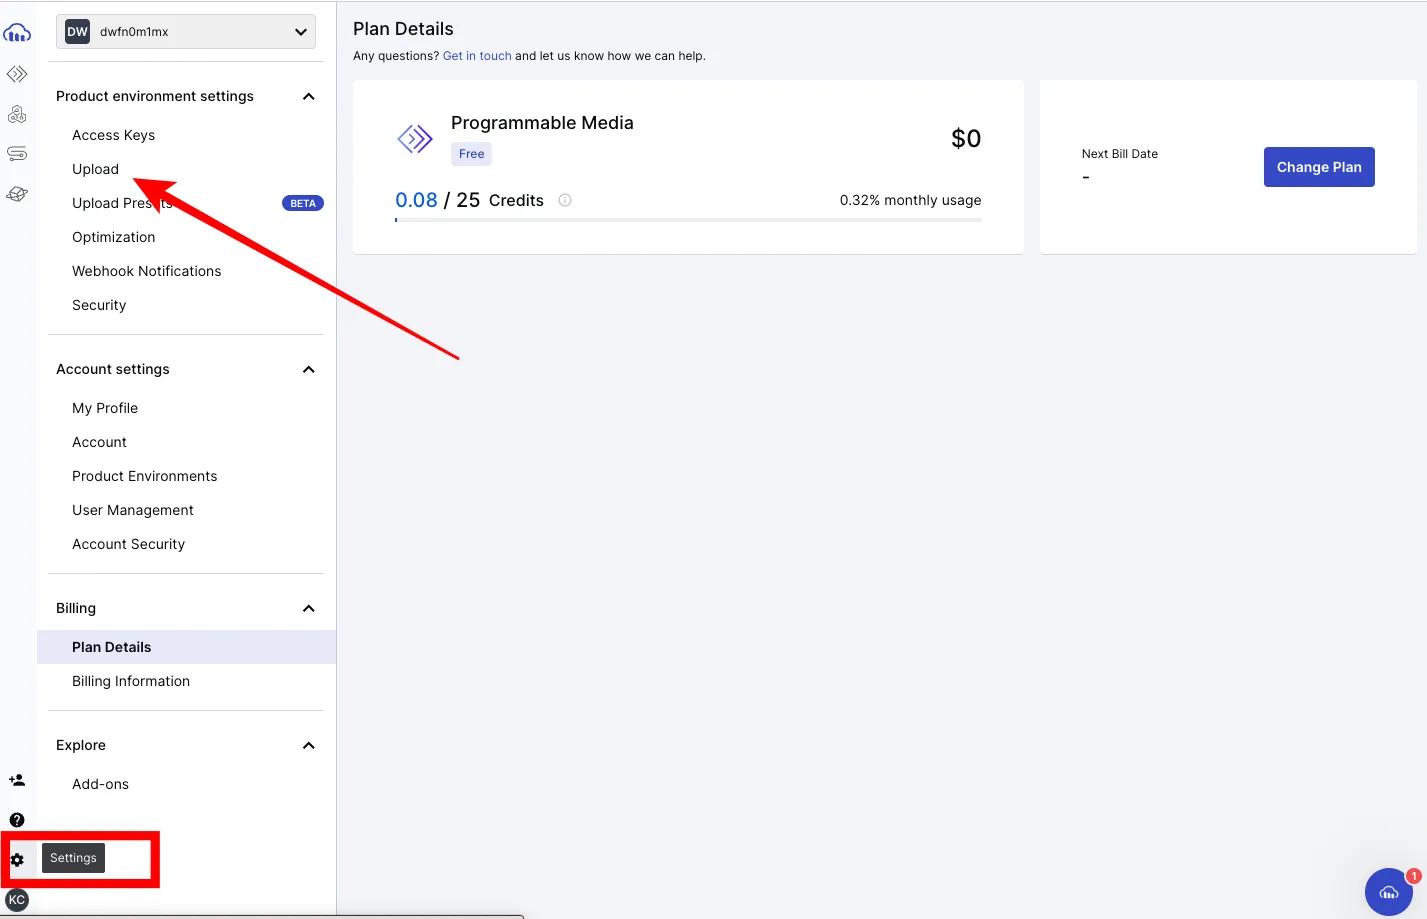
NEXT_PUBLIC_CLOUDINARY_CLOUD_NAME=NEXT_PUBLIC_CLOUDINARY_API_KEY=NEXT_PUBLIC_CLOUDINARY_API_SECRET=You also need the cloud preset name so you can use any of the components available in the Next Cloudinary NPM package.
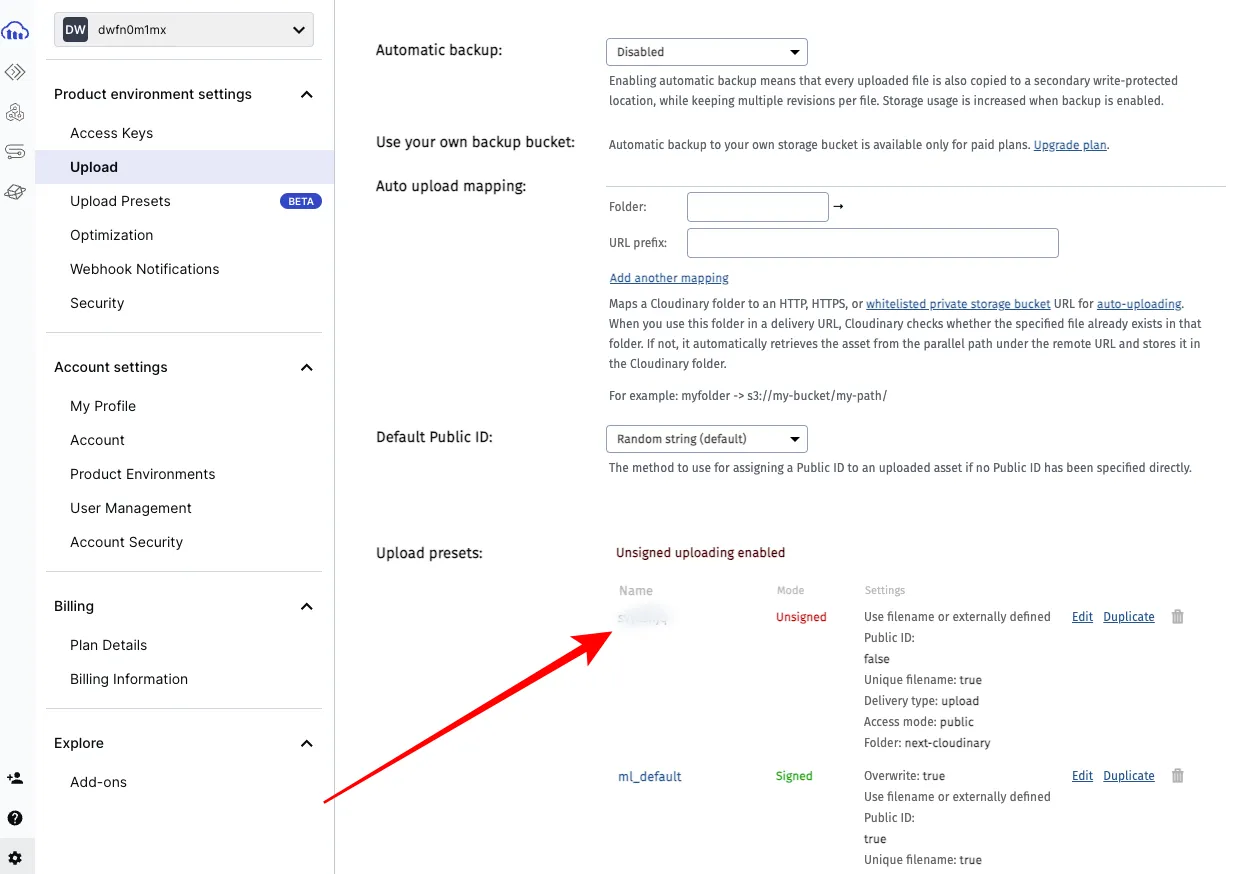
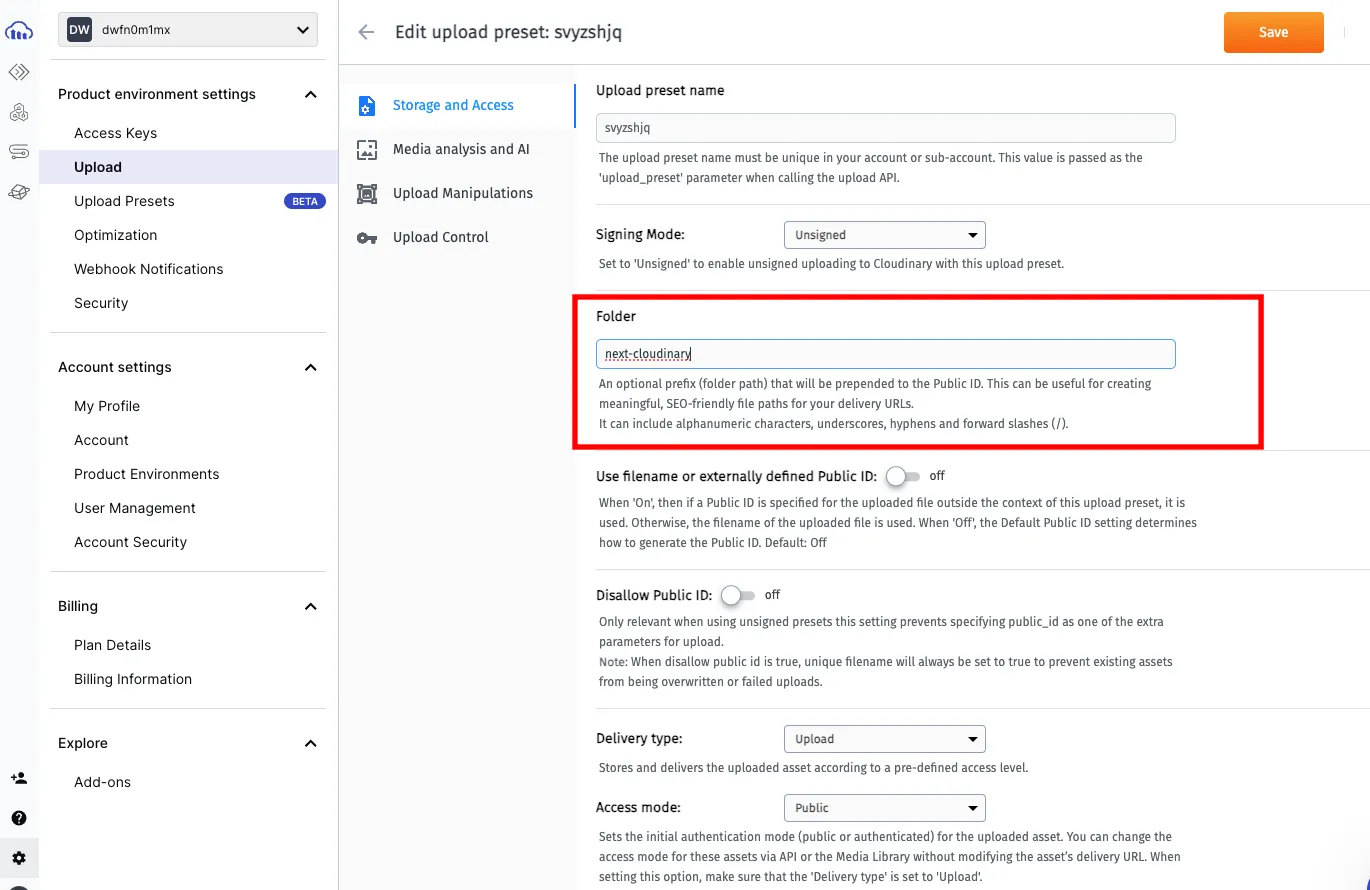
To get it, click on the gear icon in the bottom-left corner and select “Upload”:
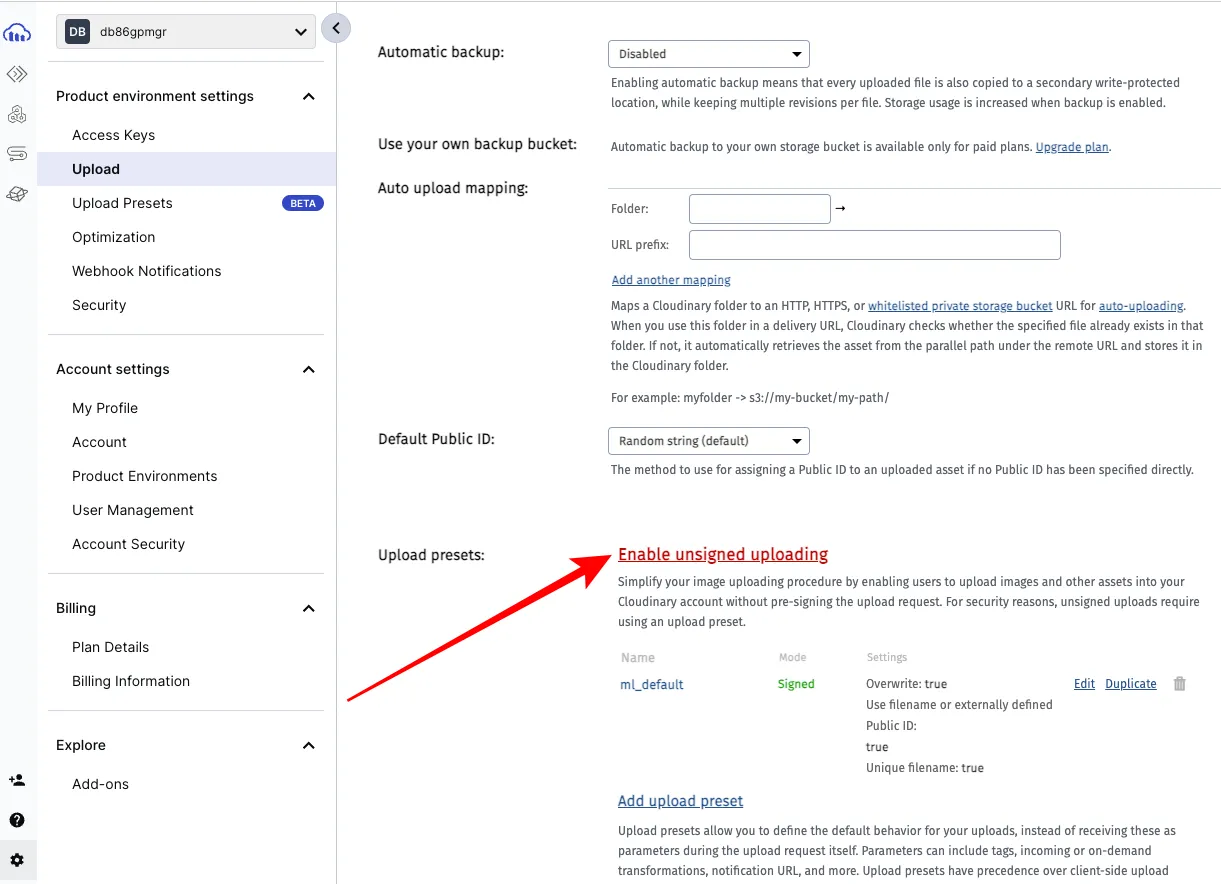
Click the red link with the text “Enable unsigned uploading”:
After that, you will see an upload preset name. Copy it and save it as the value of a NEXT_PUBLIC_CLOUDINARY_PRESET_NAME in your .env file:
The environment variables in your .env file should now look like this:
NEXT_PUBLIC_CLOUDINARY_CLOUD_NAME=valueNEXT_PUBLIC_CLOUDINARY_PRESET_NAME=valueNEXT_PUBLIC_CLOUDINARY_API_KEY=valueNEXT_PUBLIC_CLOUDINARY_API_SECRET=valueStep 4: Add Cloudinary Domain to your next.config.mjs File
You must add the Cloudinary image domain, res.cloudinary.com to the images.remotePatterns array in your Next config file for the images to work.
Your next.config.mjs file should look like this after adding it:
/** @type {import('next').NextConfig} */const nextConfig = { images: { remotePatterns: [ { protocol: 'https', hostname: 'res.cloudinary.com', }, ], },};
export default nextConfig;Step 5: Use the Next Cloudinary Built-in Component in your Components
The Next Cloudinary package has built-in components with which you can add a ready-made upload widget or button to your components. The one I chose is CldUploadButton.
Create a components folder in the root and a CloudinaryUploader.jsx client component file inside it.
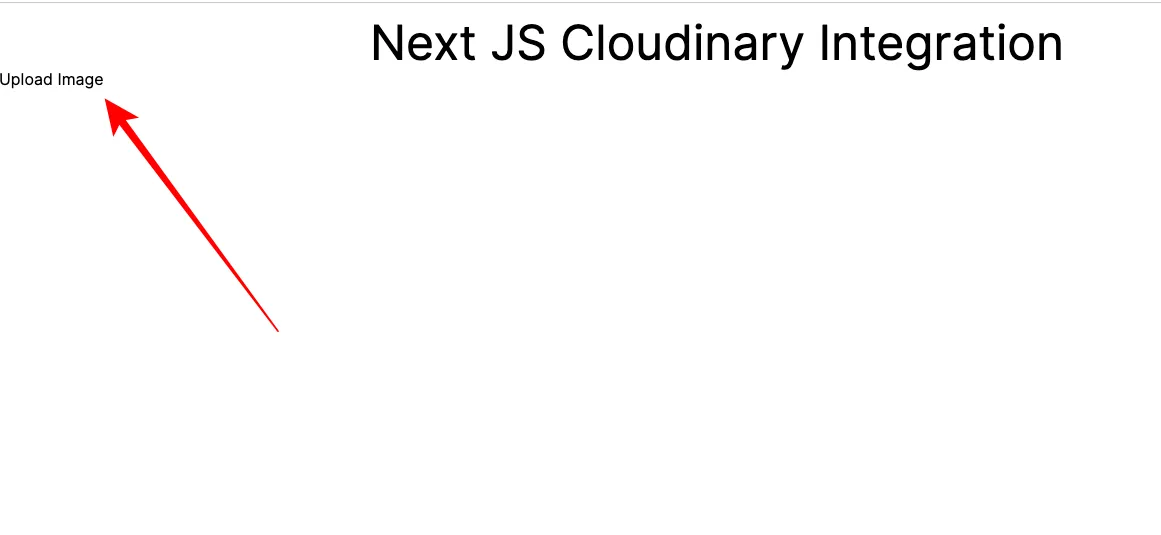
Inside the file, import the CldUploadButton component, use it in the return statement, and create a span element with the text Upload Image:
'use client';import { CldUploadButton } from 'next-cloudinary';
const CloudinaryUploader = () => { return ( <div> <CldUploadButton> <span>Upload Image</span> </CldUploadButton> </div> );};
export default CloudinaryUploader;You need to pass the options and uploadPreset properties into the component. The value for the options should be { multiple: true } to allow multiple image upload, and that of the uploadPreset should be the cloud preset name from your .env file:
'use client';import { CldUploadButton } from 'next-cloudinary';
const cloudPresetName = process.env.NEXT_PUBLIC_CLOUDINARY_PRESET_NAME;
const CloudinaryUploader = () => { return ( <div> <CldUploadButton options={{ multiple: true }} uploadPreset={cloudPresetName} > <span>Upload Image</span> </CldUploadButton> </div> );};
export default CloudinaryUploader;Clear everything inside the page.jsx file in the app folder and create an h1 tag with the text Next JS Cloudinary Integration, then import the CloudinaryUploader component and use it in the return statement
import CloudinaryUploader from '@/components/CloudinaryUploader';
function Home() { return ( <main> <h1 className=" text-5xl text-center mt-4"> Next JS Cloudinary Integration </h1>
<CloudinaryUploader /> </main> );}
export default Home;At this point, the button looks like this:
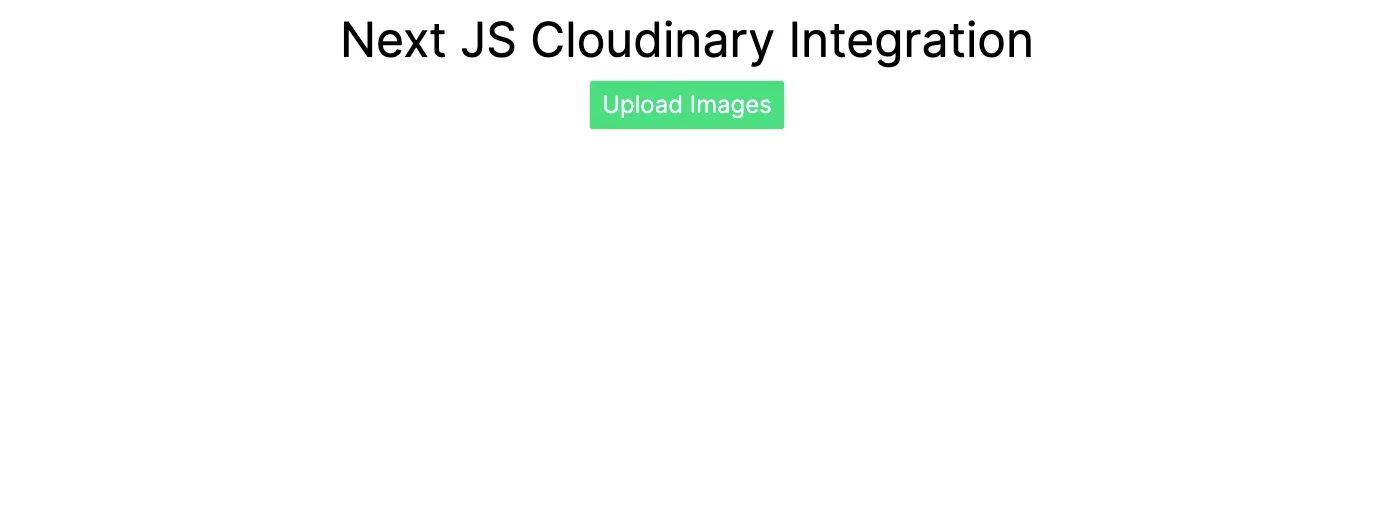
I will add some Tailwind classes to make the button and its text look better:
'use client';
import { CldUploadButton } from 'next-cloudinary';
const cloudPresetName = process.env.NEXT_PUBLIC_CLOUDINARY_PRESET_NAME;
const CloudinaryUploader = () => { return ( <div className="flex items-center justify-center "> <CldUploadButton options={{ multiple: true }} uploadPreset={cloudPresetName} className="bg-green-400 py-2 px-3 rounded border mt-4 text-white hover:bg-green-500 transition ease-in-out delay-200" > <span className="text-2xl">Upload Images</span> </CldUploadButton> </div> );};
export default CloudinaryUploader;The button now looks like this:
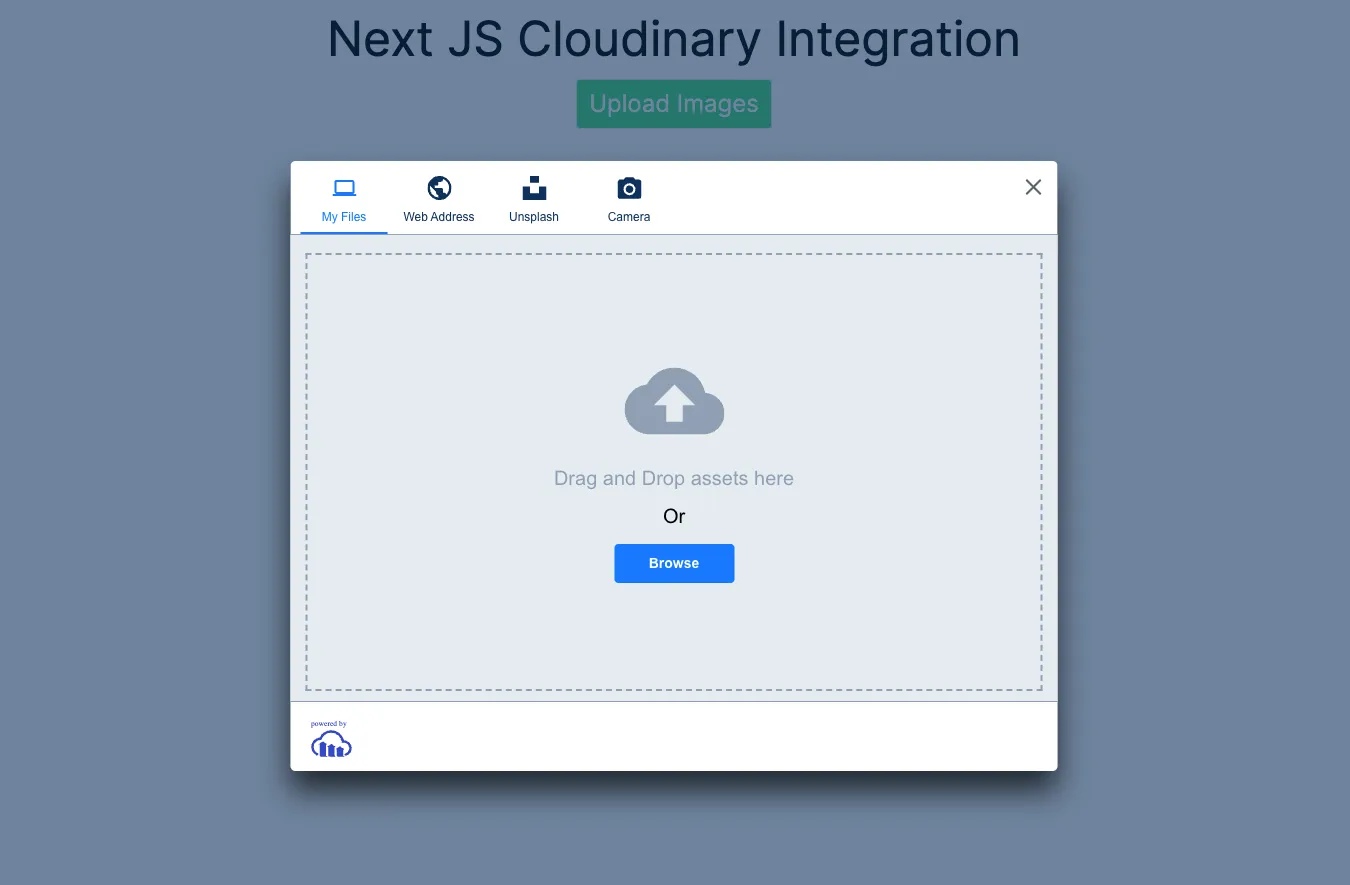
If you click the button, a giant asset upload popup will appear
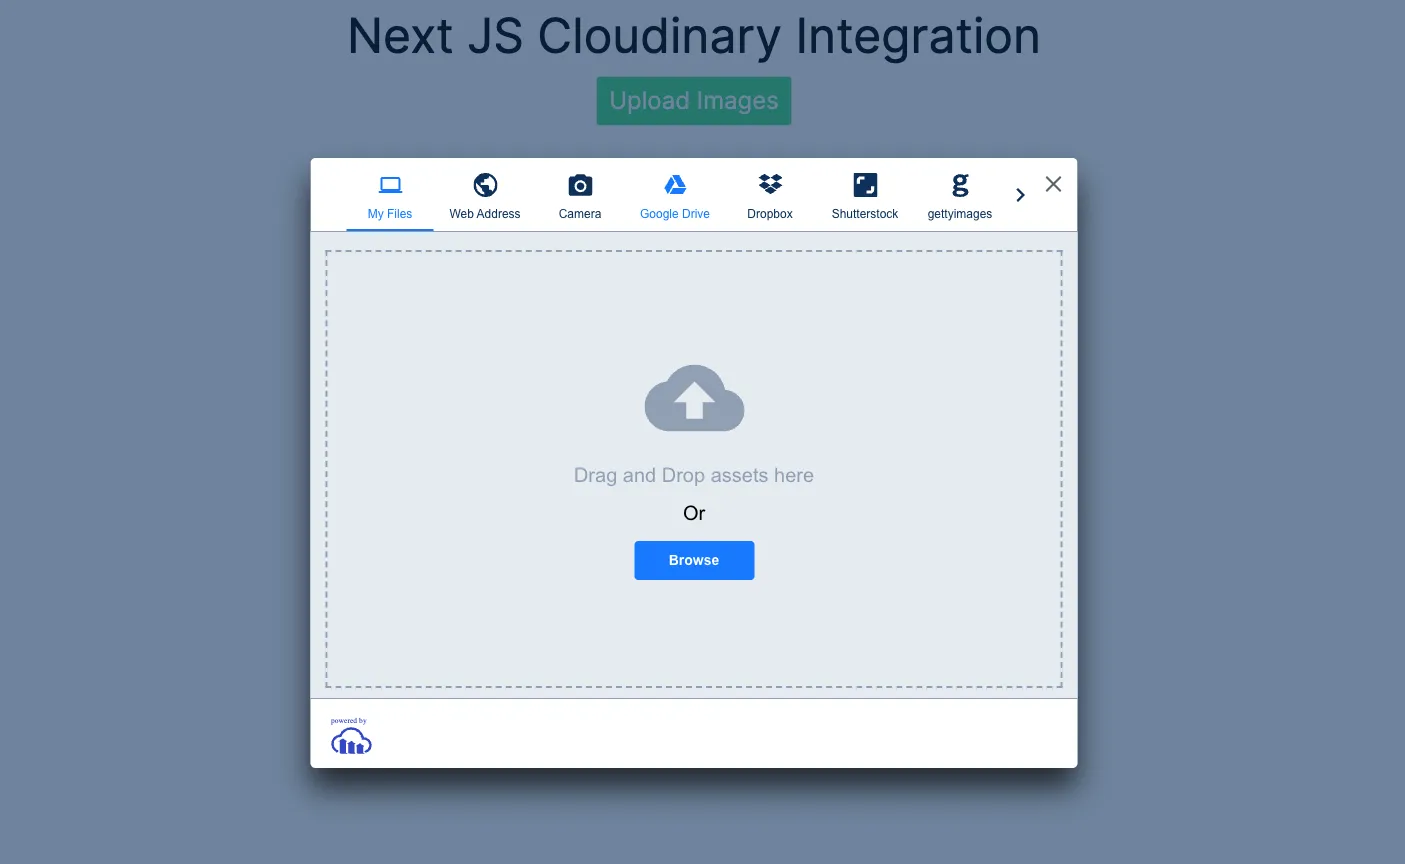
This means you can upload media through all those sources at the top – including Unsplash.
You can select which of those sources you want by passing a sources key with the sources in an array as the value into the options prop like this:
'use client';
import { CldUploadButton } from 'next-cloudinary';
const cloudPresetName = process.env.NEXT_PUBLIC_CLOUDINARY_PRESET_NAME;
const CloudinaryUploader = () => { return ( <div className="flex items-center justify-center "> <CldUploadButton options={{ multiple: true, sources: ['local', 'url', 'unsplash', 'camera'], }} uploadPreset={cloudPresetName} className="bg-green-400 py-2 px-3 rounded border mt-4 text-white hover:bg-green-500 transition ease-in-out delay-200" > <span className="text-2xl">Upload Images</span> </CldUploadButton> </div> );};
export default CloudinaryUploader;How cool is that?
Here’s what that looks like when the upload button is clicked:
At this point, If you have things set up correctly, you should be able to upload an image straight to Cloudinary.
Join my Free Newsletter
Subscribe to my newsletter for coding tips, videos from reputable sources, articles from OG tech authors, and a ton of other goodies.
No BS. No fluff. Just pure software development goodies on a Sunday every week.
How to Query the Uploaded Images from Cloudinary and Display them
Now that you have the images uploaded to CLoudinary, let’s look at how you can display them.
You don’t need the useState or useEffect hook, and the fetch API to do this because the page.jsx file inside which we will perform the query is a server component. The cloudinary search API will do it for you.
Step 1: Create a Folder for the Uploaded Images to Go Into
You need to create a folder for the images so you can query the images with that folder name using the Cloudinary search API.
Go back and click the gear icon, “Upload”, and the Unisigned preset itself
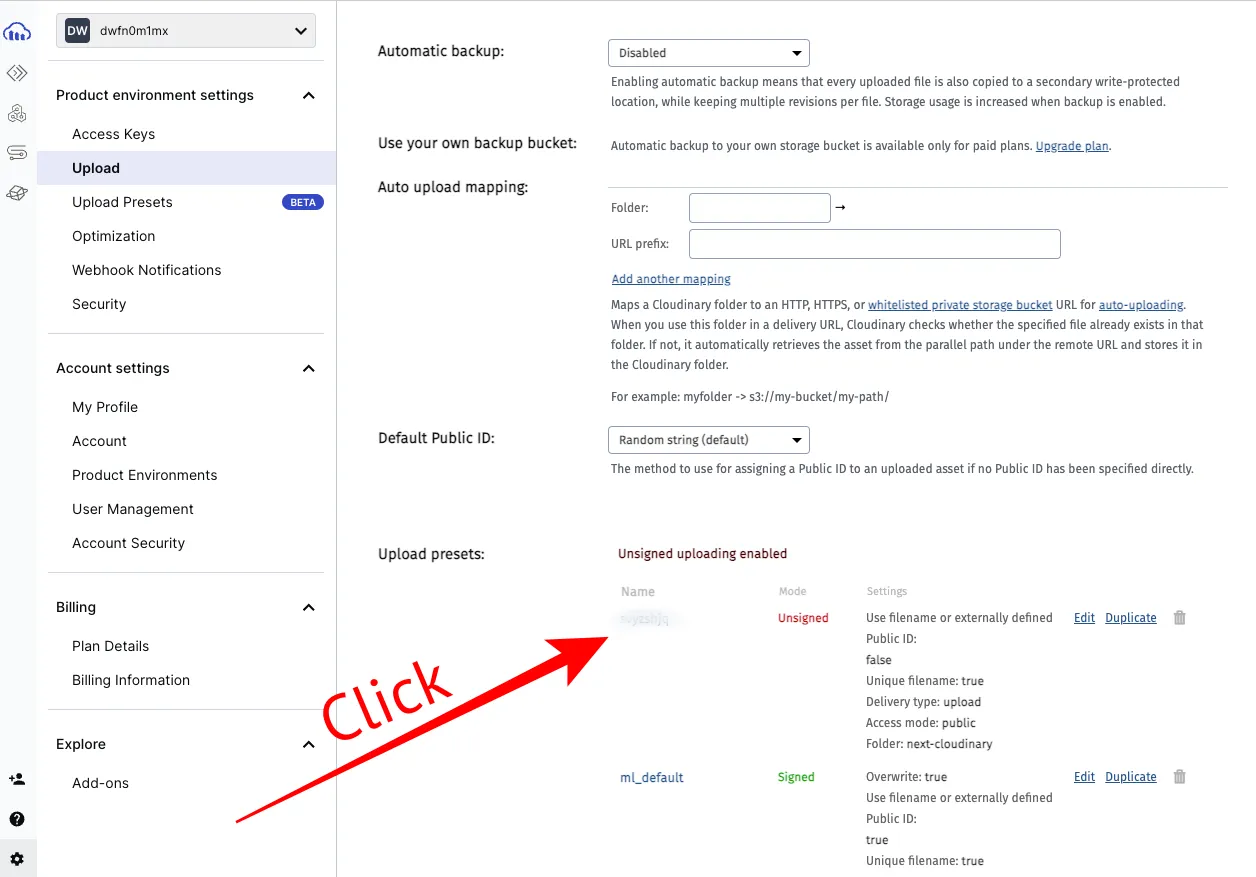
Type in a folder name right under “Folder” and click the “Save” button on the top-left corner:
Step 2: Create Cloudinary Configuration with the Cloudinary SDK (Software Development Kit)
Head back to the the page.jsx file inside the app directory and import v2 as cloudinary from the Cloudinary NPM package, then create a configuration with your cloud name, API key, and API secret:
import CloudinaryUploader from '@/components/CloudinaryUploader';
import { v2 as cloudinary } from 'cloudinary';
cloudinary.config({ cloud_name: process.env.NEXT_PUBLIC_CLOUDINARY_CLOUD_NAME, api_key: process.env.NEXT_PUBLIC_CLOUDINARY_API_KEY, api_secret: process.env.NEXT_PUBLIC_CLOUDINARY_API_SECRET,});
function Home() { return ( <main> <h1 className=" text-5xl text-center mt-4"> Next JS Cloudinary Integration </h1>
<CloudinaryUploader /> </main> );}
export default Home;You can also put the configuration in a separate file if you want.
Step 3: Fetch the Images from the Folder Using the search API
Turn the Home component to an async function, create an images constant, and await on cloudinary.search(). To get the images from that folder, you need to chain .expression(folder-name) and then the execute() function.
You can then log images.resources to the console to see the images you’ve uploaded
import CloudinaryUploader from '@/components/CloudinaryUploader';import { v2 as cloudinary } from 'cloudinary';
cloudinary.config({ cloud_name: process.env.NEXT_PUBLIC_CLOUDINARY_CLOUD_NAME, api_key: process.env.NEXT_PUBLIC_CLOUDINARY_API_KEY, api_secret: process.env.NEXT_PUBLIC_CLOUDINARY_API_SECRET,});
async function Home() { const images = await cloudinary.search .expression('next-cloudinary') .execute();
console.log(images.resources); return ( <main> <h1 className=" text-5xl text-center mt-4"> Next JS Cloudinary Integration </h1>
<CloudinaryUploader /> </main> );}
export default Home;This means you can destructure resources directly from that query if you want.
Step 4: Display the Images using the Image Component
Import Image from Next Image, map through image.resources inside the return statement, then pass in the appropriate props and values for the Image component
import CloudinaryUploader from '@/components/CloudinaryUploader';import { v2 as cloudinary } from 'cloudinary';import Image from 'next/image';
cloudinary.config({ cloud_name: process.env.NEXT_PUBLIC_CLOUDINARY_CLOUD_NAME, api_key: process.env.NEXT_PUBLIC_CLOUDINARY_API_KEY, api_secret: process.env.NEXT_PUBLIC_CLOUDINARY_API_SECRET,});
async function Home() { const images = await cloudinary.search .expression('next-cloudinary') .execute();
return ( <main> <h1 className=" text-5xl text-center mt-4"> Next JS Cloudinary Integration </h1>
<CloudinaryUploader />
{images.total_count > 0 && images.resources.map((image) => ( <div key={image.asset_id}> <Image src={image.secure_url} height={image.height} width={image.width} alt="My cloudinary image" priority /> </div> ))} </main> );}
export default Home;At this point, the images don’t look good at all
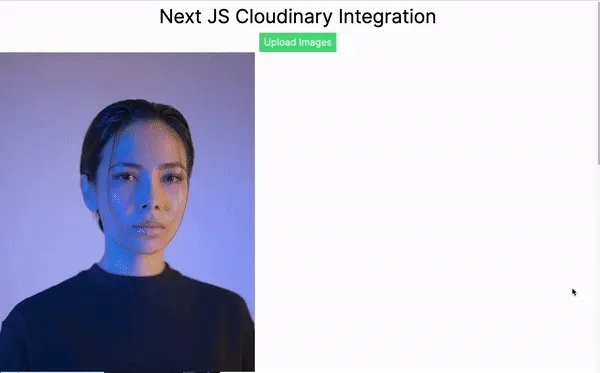
So, I’ll go ahead and add some Tailwind classes to the page
import CloudinaryUploader from '@/components/CloudinaryUploader';import { v2 as cloudinary } from 'cloudinary';import Image from 'next/image';
cloudinary.config({ cloud_name: process.env.NEXT_PUBLIC_CLOUDINARY_CLOUD_NAME, api_key: process.env.NEXT_PUBLIC_CLOUDINARY_API_KEY, api_secret: process.env.NEXT_PUBLIC_CLOUDINARY_API_SECRET,});
async function Home() { const images = await cloudinary.search .expression('next-cloudinary') .execute();
return ( <main> <h1 className=" text-5xl text-center mt-4"> Next JS Cloudinary Integration </h1>
<CloudinaryUploader />
<div className="grid grid-cols-1 sm:grid-cols-2 md:grid-cols-3 lg:grid-cols-4 gap-4" > {images.total_count > 0 && images.resources.map((image) => ( <div key={image.asset_id} className="container mx-auto max-w-screen-xl px-8 " > <Image className="flex flex-wrap justify-center" src={image.secure_url} height={image.height} width={image.width} alt="My cloudinary image" priority /> </div> ))} </div> </main> );}
export default Home;I will also add an h2 with the text Uploaded Image if there’s only one uploaded image and Uploaded Images if there is more than one uploaded image
import CloudinaryUploader from '@/components/CloudinaryUploader';import { v2 as cloudinary } from 'cloudinary';import Image from 'next/image';
cloudinary.config({ cloud_name: process.env.NEXT_PUBLIC_CLOUDINARY_CLOUD_NAME, api_key: process.env.NEXT_PUBLIC_CLOUDINARY_API_KEY, api_secret: process.env.NEXT_PUBLIC_CLOUDINARY_API_SECRET,});
async function Home() { const images = await cloudinary.search .expression('next-cloudinary') .execute();
return ( <main> <h1 className=" text-5xl text-center mt-4"> Next JS Cloudinary Integration </h1>
<CloudinaryUploader />
<h2 className="text-3xl text-center mt-10 mb-2"> {images.total_count === 1 ? 'Uploaded Image' : 'Uploaded Images'} </h2>
<div className="grid grid-cols-1 sm:grid-cols-2 md:grid-cols-3 lg:grid-cols-4 gap-4" > {images.total_count > 0 && images.resources.map((image) => ( <div key={image.asset_id} className="container mx-auto max-w-screen-xl px-8 " > <Image className="flex flex-wrap justify-center" src={image.secure_url} height={image.height} width={image.width} alt="My cloudinary image" priority /> </div> ))} </div> </main> );}
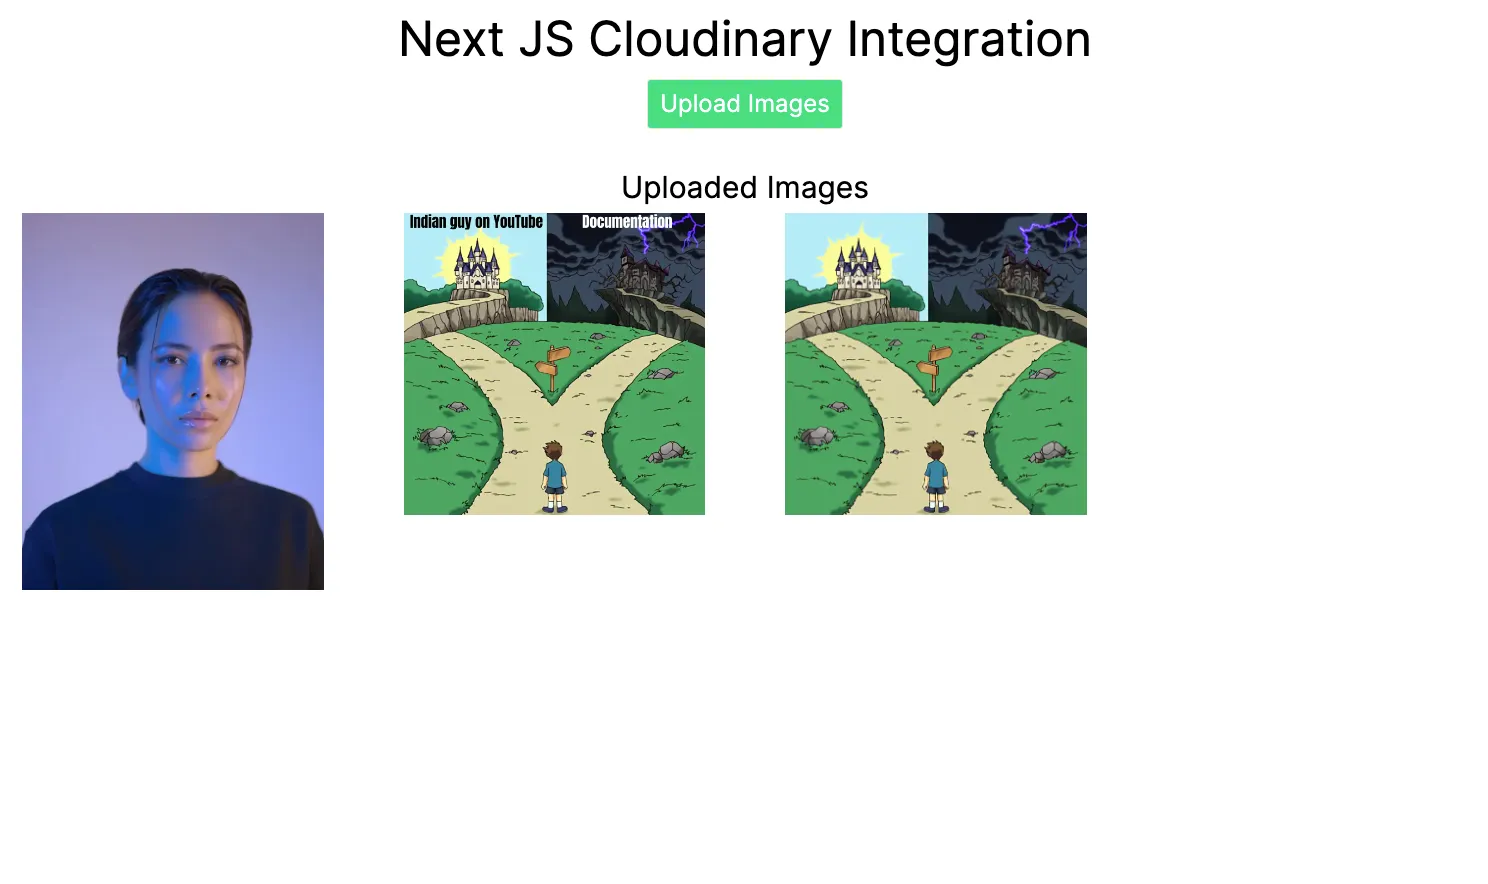
export default Home;The images look good now
Grab the full code from the project GitHub repo.
Conclusion
Whether you’re building a gallery, portfolio, or any image-intensive application, or you want to handle image upload in any other Next.js application, the combination of Next.js and Cloudinary provides a robust solution for modern web development needs.
That’s why this guide demonstrated how you can efficiently upload images using the Next Cloudinary package. In addition, you learned how to use the Cloudinary search API for displaying images, ensuring they are well-managed and seamlessly integrated into your projects.